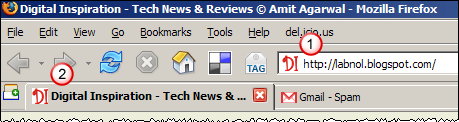
DI Reader Aboli Salvi is looking for ways to add a favicon [or bookmark icon] to her blog [like the ones you see in the screenshot above]
I am trying to change the favicon for my blog. But not much information is available on the net. Could you please post about how to go about doing this?Favicon is basically a tiny 16x16 .ico graphic file which is displayed in the browser address bar, links bar, desktop internet shortcuts, favorites menu, browser tabs and also next to your blog feed in RSS readers. While most favicons are static images, some new browsers now support animated GIFs or the transparent PNG formats [alpha channel].
Before we get into the process of creating favicon ico files and putting them to our blogs, here are some common myths that are really not true:
2. The favicon .ico files can have any file name and you are not limited to favicon.ico
3. While .ico is short for Windows icon, your favicons should appear perfect in Mac and other non-Windows systems.
4. Favicons can be created from pictures or even text but if you want to have those professional looking aqua style 3d icons, consider investing in Microangelo Icon Editor.
5. Like logos and web graphics, icons are also under copyright laws. While there are tons of programs that would let you extract ico files from Microsoft Office executables or dll files, think twice before putting them on your own site.
6. For basic icon editing, Irfanview with icon plugin is good enough for most of us.
OK, now let's get to the basics of creating favicons for your blog:
Step 1: Choosing a picture for favicon
While you can create a favicon from an image of virtually any size, it is not a good approach as the image would be squeezed to a 16x16 graphic and people won't be able to make any sense out of it.
What I would suggest is that you open your picture or logo in any photo editing software [like Picasa, Paint.NET or online image editors] and crop the image in 1:1 proportion of lenght:width keeping only the relevant portions.
For instance, if you want to show your own picture as the favicon, you might trim down everything other than your face. If you decide to have your full body and also the trees in the background, that would make your favicon less appealing.
Step 2: Creating a favicon from the picture
You will immediately get a zip file containing some four files including the favicon.ico. Extract that lone file to your hard disk and you might also rename it while keeping the ico extension inact.
Step 3: Upload the favicon file to your web server
If you have your own web space, you can upload the file their but if you are using a free blog service like Blogger, you may use Googlepages to host that favicon file. Once uploaded copy the web location of the file which will be required in the next step.
Step 4: Modify your blog template, publish
This is the last step. We might have to do some HTML coding but it's very simple and even your mom should be able to do it.
Right inside the <head> section, you may find some meta tags and link tags. Leave them as such and look for the line that says </head>
Just above the closing head tag, add the following lines:
<link rel="icon" href="www.abc.com/myicon.ico" type="image/x-icon" />
<link rel="shortcut icon" href="www.abc.com/myicon.ico" type="image/x-icon" />
The value of href will have the full permanent link of the ico file which you copied in Step 3.
Now press the save button and republish your blog template.
When you decide change your blog favicon in future, you can just replace the icon file with another version. If you keep the file name same, you may not have to make any changes to your blog templates - the changes will propogate automatically. Now how cool is that.