How to take Screenshots of Movies in Windows Media Player and prevent blank black Screen Captures
Quest: How do I capture still images from a movie playing in Microsoft Windows Media Player, Real Player, WinAmp or Apple QuickTime?
Some users try to grab the current video frame by pressing the standard Windows "Print Screen" key (next to F12 key on the QWERTY keyboard). But when the image screenshot from clipboard is pasted into an image editor, the capture is a black blank screen instead of the actual video.
 Reason: When the video plays, it is actually displayed on a different surface/layer called overlay that is produced by hardware acceleration. When you take a normal screen capture, you're taking it of the normal surface where the video isn't displayed. That's why it comes out black as it is invisible to the screen capture software.
Here are some common solutions to capture pictures from DVD movies currently playing with Windows Media Player Classic or other video players. It should also work for movies (wmv, mov, avi) embedded in a webpage.
1. Use another media player such as Power DVD, WinDVD or BSPlayer - it takes screenshots of the movie and stores them as jpegs images. Or you could try a video editor like VirtualDub.
2. Invest in a commercial screen capture software like Camtasia Studio or SnagIt (allows DirectX capture).
3. In WMP, at least since version 9, you can use Ctrl-I (EYE) to capture a frame, either when playing or when paused for greater accuracy. It brings up a Save Captured Image dialog which handily defaults to a jpeg. This works only if the video you are watching is using a Microsoft supported movie file.
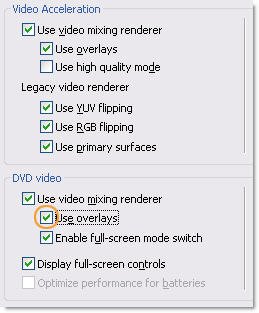
4. Don't use Overlay
1. Open your Window Media Player and click Options on the Tools menu.
2. On the Performance tab, click on the Advanced... button.
3. Uncheck Use overlays from DVD video, click OK and restart the player.
Now you can capture images from any movies played in Windows Media Player using Print Screen (PrintScrn) key (or ALT + PrintScrn key). Once copied, the image can be pasted into Microsoft Paint (Start > All Programs > Accessories > Paint) or other image editor. If you have problems taking screenshots from a playing movie try to pause it first, then "print" the image.
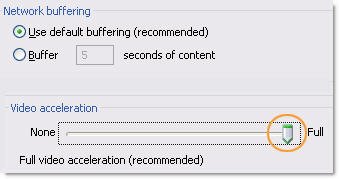
5. Fix blank captures by turning off hardware acceleration. You can either disable hardware acceleration in the application that is playing the video, or disable hardware acceleration system wide.
To disable graphics hardware acceleration globally for all applications in Windows XP or Windows 2000, Select
Control Panel - Display - Properties - Settings - Advanced - Troubleshooting and slide the Hardware Acceleration slider from Full to None.
For Windows 98 or NT systems, the path is slightly different
Control Panel - System - Performance - Graphics - Advanced settings.
Now hit the OK button at the bottom of the window. This disables all accelerations. You may need to restart the machine for the change to take effect.
 To turn Off Hardware Acceleration in Your Video Player Only:
In Windows Media Player:
1. In Media Player 7 or later, select Tools > Options > Performance tab. In Media Player v.6.4 and earlier, select View > Options > Playback.
2. Click and drag the Hardware Acceleration slider to the left, changing the setting from Full to None.
In RealOne Player:
1. Select Tools > Preferences > Hardware in the navigation pane
2 Click and drag the Playback Performance slider to the left, changing the setting from Best quality to Lowest CPU usage.
In Apple QuickTime (Standard and Pro):
1. Select Edit > Preferences > Streaming Transport. The QuickTime Settings dialog box displays.
2. From the drop-down list, select Video Settings. Click the Safe Mode (GDI Only) radio button.
In WinAmp
1. Click Options - Preferences - General Preferences, select Video.
2. Uncheck Allow hardware video overlay.
Don't forget to move the Video acceleration slider back to Full when you are done
For Windows Media Player 9, you can either turn off hardware acceleration, or use a slightly different solution that will allow you to leave hardware acceleration enabled during video capture. However, in order to capture RealPlayer or QuickTime videos, you must turn off your computer's hardware acceleration.
Capturing Still Images from a DVD Player using SnagIt - You can use SnagIt to capture still images directly from a DVD player if you are using a software DVD decoder, such as Intervideo's WinDVD or CyberLink's Power DVD. However, you may need to make the configuration changes mentioned above to your DVD player software in order to do take this type of capture. Windows Media Player cannot be used for this purpose because it does not use a standard DirectX layer to display DVD video.
Quest: How do I capture still images from a movie playing in Microsoft Windows Media Player, Real Player, WinAmp or Apple QuickTime?
Some users try to grab the current video frame by pressing the standard Windows "Print Screen" key (next to F12 key on the QWERTY keyboard). But when the image screenshot from clipboard is pasted into an image editor, the capture is a black blank screen instead of the actual video.
 Reason: When the video plays, it is actually displayed on a different surface/layer called overlay that is produced by hardware acceleration. When you take a normal screen capture, you're taking it of the normal surface where the video isn't displayed. That's why it comes out black as it is invisible to the screen capture software.
 Here are some common solutions to capture pictures from DVD movies currently playing with Windows Media Player Classic or other video players. It should also work for movies (wmv, mov, avi) embedded in a webpage.
1. Use another media player such as Power DVD, WinDVD or BSPlayer - it takes screenshots of the movie and stores them as jpegs images. Or you could try a video editor like VirtualDub.
2. Invest in a commercial screen capture software like Camtasia Studio or SnagIt (allows DirectX capture).
3. In WMP, at least since version 9, you can use Ctrl-I (EYE) to capture a frame, either when playing or when paused for greater accuracy. It brings up a Save Captured Image dialog which handily defaults to a jpeg. This works only if the video you are watching is using a Microsoft supported movie file.
4. Don't use Overlay
1. Open your Window Media Player and click Options on the Tools menu.
2. On the Performance tab, click on the Advanced... button.
3. Uncheck Use overlays from DVD video, click OK and restart the player.
Now you can capture images from any movies played in Windows Media Player using Print Screen (PrintScrn) key (or ALT + PrintScrn key). Once copied, the image can be pasted into Microsoft Paint (Start > All Programs > Accessories > Paint) or other image editor. If you have problems taking screenshots from a playing movie try to pause it first, then "print" the image.
5. Fix blank captures by turning off hardware acceleration. You can either disable hardware acceleration in the application that is playing the video, or disable hardware acceleration system wide.
To disable graphics hardware acceleration globally for all applications in Windows XP or Windows 2000, Select
Control Panel - Display - Properties - Settings - Advanced - Troubleshooting and slide the Hardware Acceleration slider from Full to None.
For Windows 98 or NT systems, the path is slightly different
Control Panel - System - Performance - Graphics - Advanced settings.
Now hit the OK button at the bottom of the window. This disables all accelerations. You may need to restart the machine for the change to take effect.
 To turn Off Hardware Acceleration in Your Video Player Only:
In Windows Media Player:
1. In Media Player 7 or later, select Tools > Options > Performance tab. In Media Player v.6.4 and earlier, select View > Options > Playback.
2. Click and drag the Hardware Acceleration slider to the left, changing the setting from Full to None.
In RealOne Player:
1. Select Tools > Preferences > Hardware in the navigation pane
2 Click and drag the Playback Performance slider to the left, changing the setting from Best quality to Lowest CPU usage.
In Apple QuickTime (Standard and Pro):
1. Select Edit > Preferences > Streaming Transport. The QuickTime Settings dialog box displays.
2. From the drop-down list, select Video Settings. Click the Safe Mode (GDI Only) radio button.
In WinAmp
1. Click Options - Preferences - General Preferences, select Video.
2. Uncheck Allow hardware video overlay.
Don't forget to move the Video acceleration slider back to Full when you are done
For Windows Media Player 9, you can either turn off hardware acceleration, or use a slightly different solution that will allow you to leave hardware acceleration enabled during video capture. However, in order to capture RealPlayer or QuickTime videos, you must turn off your computer's hardware acceleration.
Capturing Still Images from a DVD Player using SnagIt - You can use SnagIt to capture still images directly from a DVD player if you are using a software DVD decoder, such as Intervideo's WinDVD or CyberLink's Power DVD. However, you may need to make the configuration changes mentioned above to your DVD player software in order to do take this type of capture. Windows Media Player cannot be used for this purpose because it does not use a standard DirectX layer to display DVD video.